I was reflecting today on the first time I heard a Tesla Roadster power up- just this past weekend. It made me think of the BMW runs I went on back in '07, and my friends' BMW 645 with the modified exhaust. Then I came across this:
And now I have to say- I'm going to miss the sounds of driving. I fully intend to have an EV, sooner or later. But when the Tesla rep "fired up" the Roadster this weekend, all it did was click. It reminded me of the sound a ICE powered car makes when the battery is dead and you first turn the key. Nothing but a few electrical clicks. Probably relays of some sort. I think there was also a whirring sound from the battery cooling system. Yay.
Whatever the noises in the Roadster were- they were NOT sexy. They didn't make me giddy with anticipation of what was to come. In fact, they were quite laughable. I think Tesla and the other manufacturers should try to mask that sound. I'd rather hear nothing than giggle.
Tuesday, July 26, 2011
Monday, July 25, 2011
Portable EVSE? Inexpensive EVSE? You got it
Typically, electric vehicle supply equipment (EVSE) is installed at a specific location- in a garage. It becomes part of the home's infrastructure. This is an additional expense that drives up the cost of owning an EV. Add the $2500 EVSE plus installation to the cost of buying a $10k battery, and potential EV owners probably get a bit discouraged. In addition, when he considers the limited public charging infrastructure, the would-be EV owner is likely abandon hopes of freeing himself from the grips of gasoline dependence.
Leviton and some clever modders have other plans.
Portable EVSE
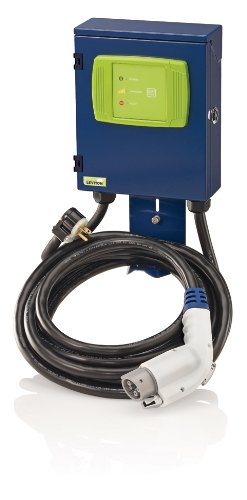
As Nick Chambers reports over at plugincars.com, Leviton has released a portable EVSE that can plug right into a standard 220V receptacle. The Evr-Green Home Charging Station This in effect means that EV owners will have access to a 120V portable charging as well as a portable $1049 level 2 EVSE thanks to Leviton. Admittedly, owners do need to have a properly installed 240V NEMA 6-20R or NEMA 6-50R, receptacle, but the Evr-Green will provide additional options.
Inexpensive EVSE
And then there is the tuner's market- where people tinker and dabble until they come up with something quite impressive - a modified Nissan Leaf EVSE that can charge at 240V instead of the standard 120V. Current stays the same at 15 amps, but you effectively get almost level 2 charging using a Level 1 EVSE. Not bad for $239. Add in $25 for the 120V adapter (so you can still use it as a Level 1 EVSE) and you are pretty much set.

But wait, there's more! If you buy now you can also get a $48 upgrade to the EVSE's firmware that will allow the Nissan's onboard charger to pull 16 amps at 240V. So for $312 plus shipping, you can get Level 2 charging. Not bad, considering installing a standard Level 2 EVSE (not the Leviton mentioned above) could take months of permitting and cost upwards of $2500.
How is this possible? Many believe that the EVSE is a charger- that it actually controls the charging of an EV's battery. NOT SO!!! If that were true, we'd call it a charger! Instead, it is called an "electric vehicle supply equipment" because, well, it supplies power to the EV. The EV has an onboard charger that is responsible for making sure the batteries don't blow up. So why do we need these very expensive EVSEs? Because electricity is almost as dangerous and 15 gallons of explosive liquid swishing around behind your childrens' bottoms. So the EVSE does things like make sure that the EV's onboard charger only pulls the amount of juice that is safely available, and that when your clumsy self trips over the power cable, you don't set yourself on fire or give yourself some serious palpitations. EVSEs are really just 99 cent extension cords with a $1000 computer attached.
And for those of you without an existing 240V line, I submit to you the Quick 220 Voltage Converting Power Supply
Just combine 2 independent 120V lines and, well, you're running out of excuses not to buy an EV...
Leviton and some clever modders have other plans.
Portable EVSE
As Nick Chambers reports over at plugincars.com, Leviton has released a portable EVSE that can plug right into a standard 220V receptacle. The Evr-Green Home Charging Station This in effect means that EV owners will have access to a 120V portable charging as well as a portable $1049 level 2 EVSE thanks to Leviton. Admittedly, owners do need to have a properly installed 240V NEMA 6-20R or NEMA 6-50R, receptacle, but the Evr-Green will provide additional options.
Inexpensive EVSE
And then there is the tuner's market- where people tinker and dabble until they come up with something quite impressive - a modified Nissan Leaf EVSE that can charge at 240V instead of the standard 120V. Current stays the same at 15 amps, but you effectively get almost level 2 charging using a Level 1 EVSE. Not bad for $239. Add in $25 for the 120V adapter (so you can still use it as a Level 1 EVSE) and you are pretty much set.
But wait, there's more! If you buy now you can also get a $48 upgrade to the EVSE's firmware that will allow the Nissan's onboard charger to pull 16 amps at 240V. So for $312 plus shipping, you can get Level 2 charging. Not bad, considering installing a standard Level 2 EVSE (not the Leviton mentioned above) could take months of permitting and cost upwards of $2500.
How is this possible? Many believe that the EVSE is a charger- that it actually controls the charging of an EV's battery. NOT SO!!! If that were true, we'd call it a charger! Instead, it is called an "electric vehicle supply equipment" because, well, it supplies power to the EV. The EV has an onboard charger that is responsible for making sure the batteries don't blow up. So why do we need these very expensive EVSEs? Because electricity is almost as dangerous and 15 gallons of explosive liquid swishing around behind your childrens' bottoms. So the EVSE does things like make sure that the EV's onboard charger only pulls the amount of juice that is safely available, and that when your clumsy self trips over the power cable, you don't set yourself on fire or give yourself some serious palpitations. EVSEs are really just 99 cent extension cords with a $1000 computer attached.
Just combine 2 independent 120V lines and, well, you're running out of excuses not to buy an EV...
Sunday, July 24, 2011
Urban Solar - Take 1 Post 3
No, I didn't give up. Well, sorta. It became painfully obvious that I have VERY quality cells. I'm getting very little power out of them. Even if I don't break any more and get them all strung together, I won't even generate enough juice to activate my grid tie inverter. Seems like a lost cause. I'm going to sell the cells on ebay (with an honest description!) and buy some new ones. This project is taking a back seat to my job search and home improvement projects, but isn't dead. I'll update again soon.
Model S Prototype - Princeton NJ
Today I had the privilege of viewing the Tesla Model S Prototype in Princeton NJ. Tesla has had the car on display for several months, and it was in Connecticut about a week ago, but I wasn't able to make it to that showing. So instead I sat in Jersey traffic for 45 minutes and eventually made my way out to D&R Greenway Land Trust where the showing was being held.
My initial posts about solar panels (I'll continue those shortly) highlighted a new interest of mine. As I've continued exploring various aspects of the green economy, I've become a bit of an EV nut. Tesla is an American company based out of California. They only make one car right now, the Tesla Roadster. It will stop being sold in September. The next vehicle will be the Model S. It is sick.
Things I learned today:
- The prototype Model S is built on a Mercedes chassis. The production vehicle will have a roomier interior.
- Tesla vehicles are equipped with GSM communication systems that allow the car to send diagnostic info to Tesla. If your car has trouble, Tesla will likely call you before you even know about the problem!
- The report that Tesla will be making battery swap/rental available seems not to have made it to the marking folks I met with today. Although they did confirm that Tesla is working with A Better Place to potentially come up with some solution to the range question.
- Tesla is also working on plans to potentially build out DC fast charge stations along high traffic areas. I threw in a vote for the I95 corridor, specifically in the NYC area.
- Tesla batteries in the Roadster need to be kept around 72 degrees. If they get too hot, the car goes into limited power mode. Something to consider if you will be driving hard in hot climates.
- All of the first year's production (with the exception of the Signature Series) have been sold. Sounds like the earliest you'd be able to get one is 2013.
Here are some pics of the Roadster that was onsite. People who had reserved a Model S were permitted to drive the Roadster- once its batteries cooled down. Since the ambient temp was about 95 degrees, the batteries stayed warm for a long while. here you can see the rep plugging in the car to a standard 110V outlet in order to try to force the car to cool down the batteries and get the car out of Performance Limited mode.
Monday, May 16, 2011
Urban Solar - Take 1 Post 2
Frack!
Went to an event at the New School in NYC today about Hydraulic Fracking and its potential effect on NYC water. More on that later. (Hint: It's freaking catastrophic!)
So where were we in our little solar adventure? Ah yes. Broken dreams.
As you probably know, solar cells, like the 6" x 6" monocrystalline cells I purchased are REALLY fragile. To put it in perspective, imagine a thin sheet of glass- maybe the thickness of 2-3 sheets of paper. The sad part is that I knew this going in and still managed to break the first one. Here's how:
I watched several videos on how to tab solar cells. Tabbing is what you call soldering the tabbing wire to the cells. This tabbing wire ensures that the current along the negative side (front) of the solar panel travels along the entire cell and can be linked to the next solar cell. Monocrystalline cells like mine tend to have 3 bus bars going down the front. Polycrystalline cells have 2 bus bars, and amorphous cells have no bus bars. The tabbing wire is slightly wider than the bus bar and has solder built in, right on the tabbing wire itself. Each strand of tabbing wire should be cut to about 2x the length of the cell so that it can be run down the length of the front of one cell, then down the length of the BACK of the next cell.
Before you can attach the tabbing wire though, you need to use flux. The flux pen should be run down each of the bus bars in turn. It cleans oils and oxides off of the bars and ensures a better solder.
I took the flex pen and "wet" it by pressing it onto a small piece of aluminum foil. Nothing special about the foil, it's just what I had nearby. The liquid in the pen came gushing out. Ok, not like Old Faithful or anything, just A LOT faster than I expected. I was able to rewet by dipping in the pool of smelly brown/yellow liquid in my aluminum foil.
Now, super eager to get to the business of actually DOING something, I placed the solar cell on top of a piece of cardboard, to protect the table from the heat of the solder.
Oops.
Withing a few seconds, the uneven distribution of pressure (aka ME) on the cell caused it to crack. This leads me to my first gotcha of the process:
So yeah, no crappy soldering irons. I'm getting a 40 watt tomorrow. I'll try with that and see where it takes me.So far, I have a pool of smelling yellow corrosive stuff, a cracked cell, and zero tabbing.
Maybe I should have tried melting concrete instead. Looks easier.
Went to an event at the New School in NYC today about Hydraulic Fracking and its potential effect on NYC water. More on that later. (Hint: It's freaking catastrophic!)
So where were we in our little solar adventure? Ah yes. Broken dreams.
As you probably know, solar cells, like the 6" x 6" monocrystalline cells I purchased are REALLY fragile. To put it in perspective, imagine a thin sheet of glass- maybe the thickness of 2-3 sheets of paper. The sad part is that I knew this going in and still managed to break the first one. Here's how:
I watched several videos on how to tab solar cells. Tabbing is what you call soldering the tabbing wire to the cells. This tabbing wire ensures that the current along the negative side (front) of the solar panel travels along the entire cell and can be linked to the next solar cell. Monocrystalline cells like mine tend to have 3 bus bars going down the front. Polycrystalline cells have 2 bus bars, and amorphous cells have no bus bars. The tabbing wire is slightly wider than the bus bar and has solder built in, right on the tabbing wire itself. Each strand of tabbing wire should be cut to about 2x the length of the cell so that it can be run down the length of the front of one cell, then down the length of the BACK of the next cell.
Before you can attach the tabbing wire though, you need to use flux. The flux pen should be run down each of the bus bars in turn. It cleans oils and oxides off of the bars and ensures a better solder.
I took the flex pen and "wet" it by pressing it onto a small piece of aluminum foil. Nothing special about the foil, it's just what I had nearby. The liquid in the pen came gushing out. Ok, not like Old Faithful or anything, just A LOT faster than I expected. I was able to rewet by dipping in the pool of smelly brown/yellow liquid in my aluminum foil.
Now, super eager to get to the business of actually DOING something, I placed the solar cell on top of a piece of cardboard, to protect the table from the heat of the solder.
Oops.
Withing a few seconds, the uneven distribution of pressure (aka ME) on the cell caused it to crack. This leads me to my first gotcha of the process:
- The surface behind the solar cell should be hard, sturdy and absolutely flat. I've heard good things about using a clean piece of sturdy glass that has been laid on a hard surface (table, work bench, etc). The reason for the glass is that it helps dissipate the heat from the soldering iron and prevent damage to the cell.
- Get a (wo)man's soldering iron. This cutesy little 23 watt p.o.s. did absolutely nothing. It was unable to melt the solder on the tabbing wire. With a good soldering iron, you should be able to run the iron down the length of the cell in about 1-2 seconds and have a good solder. The wattage doesn't indicate temperature, it's a measure of the "reserve" heat. When you touch the tip to the cell, heat transfers to the tabbing wire, the bus bar, and the whole cell. At 23 watts, the soldering iron couldn't make enough replacement heat to get the tab solder up to the melting point. Sadness.
So yeah, no crappy soldering irons. I'm getting a 40 watt tomorrow. I'll try with that and see where it takes me.So far, I have a pool of smelling yellow corrosive stuff, a cracked cell, and zero tabbing.
Maybe I should have tried melting concrete instead. Looks easier.
Urban Solar - Take 1 Post 1
There are probably hundreds of videos on YouTube relating to DIY solar projects. Sometimes elaborate, sometimes rather sparse, but almost always in some back yard, shed, garage or what have you. That makes sense, since typically, cities aren't exactly the best place to start trying to set up Solar PV panels. But I'm a geek. And I was bored.
My goal is simple: Build a custom solar panel and use it to offset some of my vampire load in the apartment. Before you flame me:
So that said, I have an apartment with generously sized windows in NYC. They face downtown and "West". If you are familiar with NYC, you know that "downtown" is South-ish. And "West" is "sorta-West", at least as far as the Earth is concerned. I'll stick with South and West, and in true NYC fashion, let you conform to my naming conventions. ; ) See below:
(notice, no shadows! Unless Mr. Trump comes in to grace us with another one of his buildings, I think I will be shadow free for a long while)
Now what? I don't have $1k+ to drop on a solar panel, an inverter, mounting supplies, batteries, etc. So I purchased some used supplies off of Ebay. These included:
In my next post, I'll explain how I went from a bright eyed solar novice to this:
Off to dream up my next post.
My goal is simple: Build a custom solar panel and use it to offset some of my vampire load in the apartment. Before you flame me:
- Yes, I know the amount I offset will likely be tiny
- Yes, I know that this will likely take 5+ years to pay for itself
- No, I am not crazy. I mean, I don't think so.
So that said, I have an apartment with generously sized windows in NYC. They face downtown and "West". If you are familiar with NYC, you know that "downtown" is South-ish. And "West" is "sorta-West", at least as far as the Earth is concerned. I'll stick with South and West, and in true NYC fashion, let you conform to my naming conventions. ; ) See below:
(notice, no shadows! Unless Mr. Trump comes in to grace us with another one of his buildings, I think I will be shadow free for a long while)
Now what? I don't have $1k+ to drop on a solar panel, an inverter, mounting supplies, batteries, etc. So I purchased some used supplies off of Ebay. These included:
- 30 Grade B Monocrystalline solar cells (NOT panels)
- Associated tabbing wire, bus wire, and flux pen
- A really subpar, completely inappropriate and unusable 23 watt soldering iron
- A dinky 300 watt Grid Tie Inverter
- A multimeter (actually, I owned this already)
In my next post, I'll explain how I went from a bright eyed solar novice to this:
Off to dream up my next post.
Who, Why, What, Where etc
The Green Frog. Who? Me!
The name stems from a series of synapses firing in what seemed like a logical progression of thought. The trigger was that my actual name is already taken as a Twitter handle. I joined really late (4 weeks ago?). So I had to get creative. Take my first initial, few letters from my last name, throw in some Spanish and a nod toward my sustainability interests, and (E)LSapoVerde is born. Since I invested at least 18 seconds in the creation of that name for Twitter, I figured I should use it again, to get the best ROI on my time and ROA on the name.
So here we are, but where is here? Well, this is my first ever blog entry. And this is the space where I intend to collect my findings, thoughts, and rants regarding CleanTech, Sustainability, the Green Economy, Renewable Energy, Alternative Energy (/shameless keyword plugs) and perhaps even my noisy Harlem neighbors. Maybe.
So let's begin then. I'll start with my urban solar project. Who says that people living in a sardine can stacked 10+ stories up in the air can't do solar PV in their "homes" ? Why do the private houses get to have all the fun? I'll show them.
The name stems from a series of synapses firing in what seemed like a logical progression of thought. The trigger was that my actual name is already taken as a Twitter handle. I joined really late (4 weeks ago?). So I had to get creative. Take my first initial, few letters from my last name, throw in some Spanish and a nod toward my sustainability interests, and (E)LSapoVerde is born. Since I invested at least 18 seconds in the creation of that name for Twitter, I figured I should use it again, to get the best ROI on my time and ROA on the name.
So here we are, but where is here? Well, this is my first ever blog entry. And this is the space where I intend to collect my findings, thoughts, and rants regarding CleanTech, Sustainability, the Green Economy, Renewable Energy, Alternative Energy (/shameless keyword plugs) and perhaps even my noisy Harlem neighbors. Maybe.
So let's begin then. I'll start with my urban solar project. Who says that people living in a sardine can stacked 10+ stories up in the air can't do solar PV in their "homes" ? Why do the private houses get to have all the fun? I'll show them.
Subscribe to:
Posts (Atom)